Usage Guide
Poseidon Flow is a tool for visually designing the page structure and navigation flow of your site.
This guide covers everything from basic operations to advanced features.
🚀 Launching the App
Just run the following command in your terminal. No additional installation is needed as long as you have Node.js.
npx poseidon-flow@latest
If your browser doesn't open automatically, navigate to http://localhost:7437.
If port 7437 is taken, Poseidon Flow will automatically try 7438, 7439, and so on. Check the URL shown in your terminal. If an instance is already running, a new process won't start — instead, the existing URL is displayed and the command exits.
🖥 Interface Overview
Top Toolbar
Main action buttons: switch projects, add pages, fit view, load samples, AI generation, export, and more.
Canvas (Center)
The main area where you place and connect page nodes.
Right Panel
Edit the selected page's name, path, prompt, and components.
Mini-map (Bottom Right)
A bird's-eye view of your entire diagram. Click to jump to any area.
📄 Adding, Editing & Deleting Pages
Adding a Page
Click the "+ Add Page" button in the toolbar
Clicking the button at the top of the screen adds a new page node to the canvas.
Fill in page details in the right panel
Enter a page name (e.g. "Product List") and a path (e.g. /products).
Optionally add components
Use the component list at the bottom of the right panel to add UI elements included in this page.
Editing a Page
Click any page node on the canvas to open the edit form in the right panel. You can freely modify the page name, path, prompt (AI generation hint), and components. Enter prompts in bullet-point format — one item per line.
Duplicating a Page
Cmd + D (Windows: Ctrl + D) is not yet implemented. To duplicate a page, add a new one via the "+ Add Page" button and copy the details manually in the right panel.
Deleting a Page
Select the page you want to remove and press Delete or Backspace. You can also select multiple pages and delete them all at once.
The "✕ Clear All" button in the toolbar removes all pages and transitions. You can undo this with Cmd + Z.
🔗 Connecting Pages (Creating Transitions)
To create a transition (arrow) between pages, drag from a handle on the edge of a node.
Hover over a page node
Circular handles appear on the top, bottom, left, and right edges of the node.
Drag from a handle to another page
Click and drag from a handle to the destination page node.
Add a label (optional)
Double-click the arrow to add a label (e.g. "Click Login").
To delete a transition, click the arrow to select it and press Delete.
🖱 Canvas Navigation
Pan the Canvas
Drag on an empty area of the canvas.
Zoom
Scroll the mouse wheel.
Move a Page
Drag the page node.
Fit View
Click the "⊡ Fit View" button in the toolbar to fit the entire diagram on screen.
Navigate via Mini-map
Click anywhere on the mini-map in the bottom-right to jump to that position.
☑️ Multi-Selection
Use multi-selection when you want to move or delete several pages at once.
| Action | Method |
|---|---|
| Box select | Hold Shift and drag on the canvas |
| Add to selection | Hold Shift and click a page |
| Delete selection | Press Delete or Backspace after selecting |
After selecting multiple pages, drag any of them to move the entire group.
🧩 Components
Record which UI elements are included in each page. Think of it as a living spec sheet for your page design.
Select a page to open the right panel
Click any page node on the canvas.
Enter a component name and description, then add it
Type a name (e.g. Header) and description (e.g. Global nav, logo), then click "Add to Page". Click "Add to Library" to share it across all pages.
Reorder by dragging
Drag and drop components to reorder them. You can also use the up/down arrow buttons on each card.
Page Type & Auth Flag
In addition to components, you can also set the page type and authentication requirement in the right panel.
Page Type
Choose from landing / listing / detail / cart / checkout / auth / mypage / other. This serves as a hint for AI generation.
Requires Auth
Check the "Login required" checkbox to flag a page as authentication-protected. This is also reflected in the AI brief.
🔒 Lock Feature
Both components and pages can be locked individually.
Page Lock
Click the 🔓 button next to the page name in the right panel to lock it (🔒). Locked pages are skipped during bulk generation — useful for protecting already-generated HTML.
Component Lock
Click the 🔓 button on a component card to lock it (🔒). Locked components won't be overwritten during AI regeneration.
Component descriptions are used as hints for AI wireframe generation. The more detail you provide, the better the results.
📁 Project Management
Save and switch between multiple named site designs. Click the project button in the toolbar (◫ Untitled ▼) to manage projects.
Saving a Project
Click the project button in the toolbar
Click the button showing the current project name (or "Untitled" if unsaved).
Enter a project name and click "Save"
Enter a name (e.g. my-blog). You can optionally associate a directory path (e.g. /Users/me/projects/blog).
Switching Projects
Click a project name in the project list to switch to that design. The current project is indicated with a ●.
Directory Association
You can associate a local directory path with each project — useful for keeping track of which codebase a design corresponds to.
After importing a file, a "Save as Project" bar appears at the top of the modal. Enter a name and directory to save, or click "Skip" to dismiss.
📋 Sample Templates
Click "◈ Samples ▾" in the toolbar to open a dropdown of industry-specific templates. Choose from 7 samples to load instantly.
| Sample | Description |
|---|---|
| 🛒 E-Commerce | 26 pages · Full purchase flow (product listing → order complete, my page, contact, etc.) |
| 🏢 Corporate | 10 pages · Company website |
| 🎓 School / University | 9 pages · Educational institution |
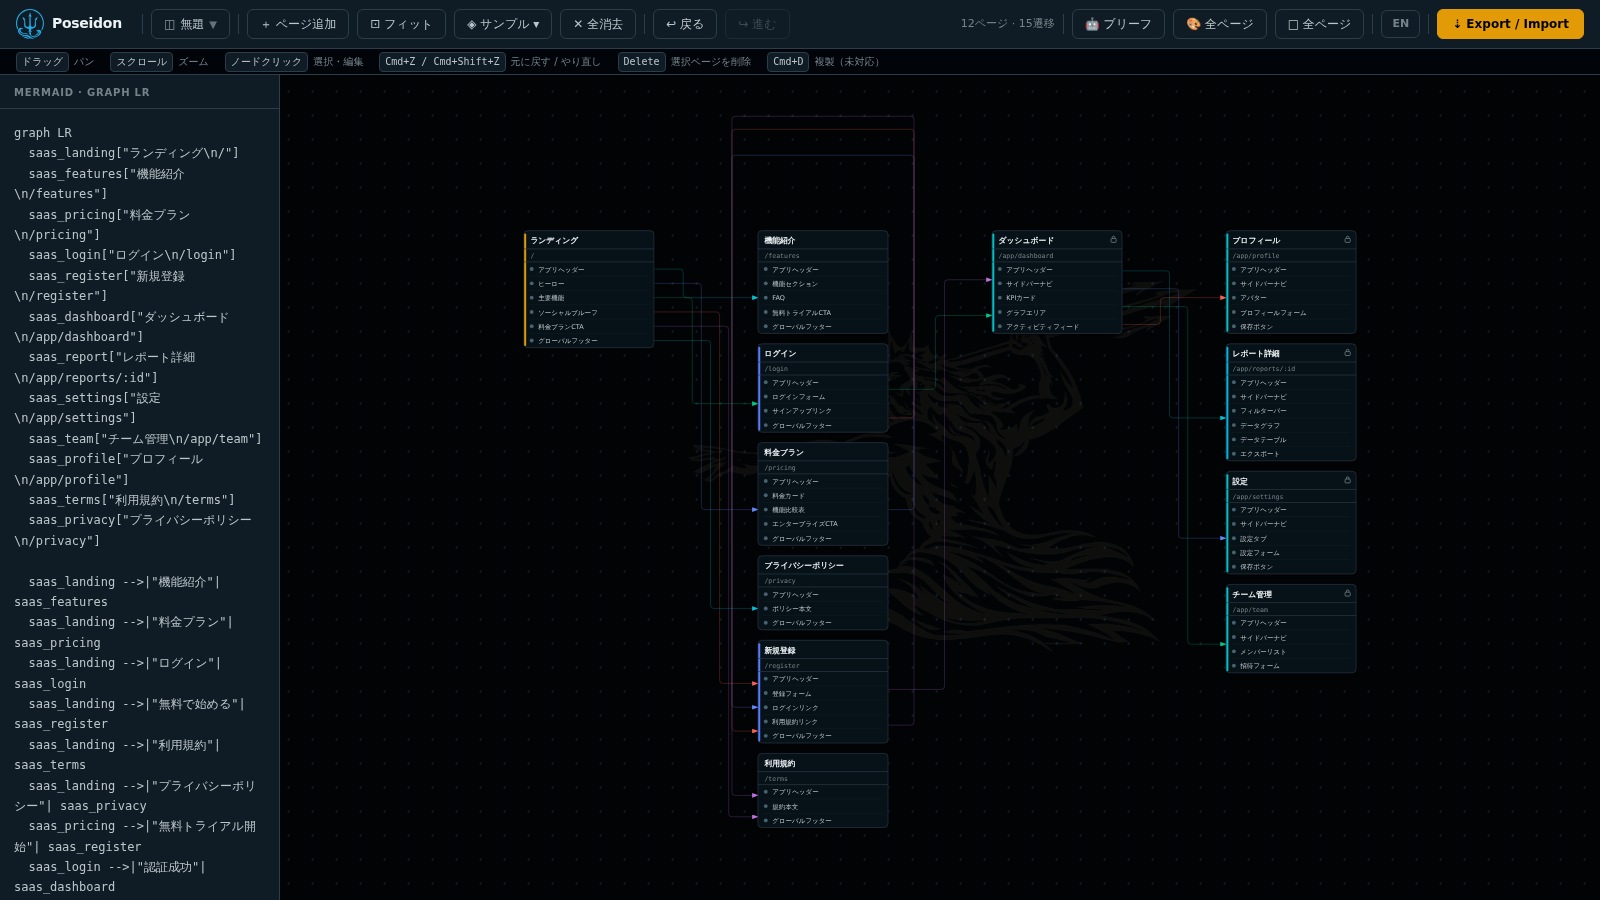
| 💻 SaaS | 12 pages · Dashboard app |
| 📰 Blog / Media | 8 pages · Content site |
| 🏥 Hospital / Clinic | 10 pages · Appointment booking flow |
| 💒 Bridal | 10 pages · Event reservation flow |
E-Commerce Sample Page Structure
The e-commerce sample includes the complete purchase flow (26 pages, 37 transitions):
Use this as a starting point to get a feel for how Poseidon Flow works.
📤 Export
Click the "⇣ Export / Import" button in the toolbar to open the modal, where you can preview Mermaid diagrams, generate an AI brief, export files, and import — all in one place.
Mermaid Tab (sitemap / pages / flows)
Shows the entire site's page transitions in Mermaid syntax. Copy it or download as sitemap.mmd.
Shows the component structure of each page in Mermaid syntax. View and download per page.
Shows the transition flow for each page in Mermaid syntax. View and download per page.
Export Buttons
Writes .mmd files, project.json, and ai-brief.md to a poseidon/ folder in the current directory.
Packages the above files into a ZIP archive and downloads it via the browser.
Load project.json back into Poseidon Flow to continue editing where you left off.
Using Mermaid Output
Paste the contents of an exported .mmd file into GitHub Markdown and it will render as a diagram:
```mermaid
graph TD
  Home --> ProductList
  ProductList --> ProductDetail
  ProductDetail --> Cart
  Cart --> OrderComplete
```
📥 Import
Load a previously exported JSON or Mermaid file to resume work from where you left off.
Click "⇣ Export / Import"
Open the modal from the toolbar button.
Choose an import method
Click "Load from Directory" or "Load from File" to select a JSON or Mermaid file.
Save as a project (optional)
After a successful import, a "Save as Project" bar appears at the top of the modal. Enter a project name and directory path to save, or click "Skip" to close.
⌨️ Keyboard Shortcuts
| Action | Mac | Windows |
|---|---|---|
| Undo | Cmd + Z | Ctrl + Z |
| Redo | Cmd + Shift + Z | Ctrl + Y |
| Duplicate Page (not yet implemented) | Cmd + D | Ctrl + D |
| Delete | Delete or Backspace | Delete or Backspace |
| Box Select | Shift + drag | Shift + drag |
| Add to Selection | Shift + click | Shift + click |
🤖 AI Wireframe / Design Generation
There are two ways to generate wireframes and designs automatically.
Under Anthropic's new billing policy, generating via the UI button without an API key (Method 1) goes through
claude -p CLI and is drawn from your Agent SDK credits. Pro plan users have $20/month of credits — once exhausted, generation stops or incurs extra charges.If you don't have an API key, Method 2 (Claude Code + MCP) is recommended. Claude Code itself does the inference, so only normal subscription usage applies.
| Method | Requirement | Billing |
|---|---|---|
| Method 1 (UI button) + API key | AI_API_KEY set | Anthropic API pay-as-you-go |
| Method 2 (Claude Code + MCP) | No API key needed | Normal subscription only |
| Method 1 (UI button) + no API key | Claude CLI in PATH | ⚠️ Agent SDK credits consumed |
Method 1 — Generate from the Right Panel
Click a page node to open the right panel
Click any page on the canvas to open the right panel.
Click the generate button
Click the "Generate Wireframe" or "Generate Design" button at the top of the right panel. Claude Code will automatically generate and save the HTML.
Preview the result
After generation, "□" (wireframe) and "🎨" (design) buttons appear in the right panel. Click to open a preview in a new tab.
Method 2 — Ask Claude Code (MCP)
With MCP configured, you can chat with Claude Code to generate everything in bulk.
Check the site structure with get_project_summary, then
generate HTML wireframes for each page in order and
save them with set_wireframe_html.
You can target a specific page like this:
Generate a wireframe for the brd-home page and save it with set_wireframe_html.
Design Generation (DESIGN.md)
Write a design system definition (DESIGN.md) in the "AI" tab of the "⇣ Export / Import" modal. Claude Code will then generate realistic HTML designs that reflect your brand colors, fonts, and component styles.
Grab a DESIGN.md from Refero Styles that matches your target UI, paste it in, and professional design tokens are applied instantly.
AI Brief Panel (🤖 Brief)
Click the "🤖 Brief" button in the toolbar to generate and copy a Markdown summary of your entire project structure. Paste it directly into Claude or any other AI chat for context.
🎨 Figma Export
Send your generated wireframes or designs directly to a Figma file.
Using Claude Code (Recommended)
The "Send to Figma" button in the UI uses Claude Code's Figma MCP credentials (~/.claude/.credentials.json).
Connect to Figma MCP in Claude Code
In Claude Code's chat, type /mcp, select Figma, and complete the OAuth flow. Credentials are saved automatically.
Make sure Chrome / Chromium is installed
Auto-detected paths: /opt/google/chrome/chrome, /usr/bin/google-chrome, /usr/bin/chromium, etc. For a custom path, set the environment variable: CHROME_PATH=/path/to/chrome npx poseidon-flow@latest
Open a page preview and click "Send to Figma ▾"
Enter the File Key (the ID in the Figma URL) and click "Send". You can target a new page or a specific node by ID.
When sending, Chrome launches and uses your active Figma session to transfer the HTML. Sending will fail if you are not logged in to Figma.
Using Other AI Agents (Cursor / Copilot, etc.)
The "Send to Figma" button is exclusive to Claude Code, but by combining the poseidon-flow MCP + your AI's Figma MCP, you can achieve the same result.
Use list_pages to see all pages, then get_page to get the preview URL.
Pass the retrieved preview URL to your Figma MCP's generate_figma_design.
Preview URL format:
http://localhost:7437/preview/wireframe/{pageId}/content
http://localhost:7437/preview/design/{pageId}/content
Example instruction to your AI:
Send the poseidon-flow brd-home page (URL: http://localhost:7437/preview/wireframe/brd-home/content)
to Figma using the generate_figma_design tool with fileKey=AbCdEfG123.
🔌 MCP Integration (Claude Code / AI Agents)
Poseidon Flow includes a built-in MCP (Model Context Protocol) server. Connect it to an AI agent to read and write project page data, and have the AI automatically generate and save wireframes.
Setup — Global Configuration
Add the following to ~/.claude/settings.json:
{
  "mcpServers": {
    "poseidon-flow": {
      "command": "npx",
      "args": ["poseidon-flow", "--mcp"]
    }
  }
}
Setup — Project-Local Configuration
Create a .mcp.json file in your project root:
{
  "mcpServers": {
    "poseidon-flow": {
      "command": "npx",
      "args": ["poseidon-flow", "--mcp"]
    }
  }
}
The MCP server connects to a locally running instance of poseidon-flow. Run
npx poseidon-flow@latest first, then use your AI agent. The port is read automatically from ~/.poseidon-flow/port, so no config changes are needed even if the port changes.
Available Tools
| Tool | Description |
|---|---|
list_pages |
Get a list of all pages |
get_page |
Get detailed info for a page (prompt, components, preview URL, etc.) |
get_project_summary |
Get a full overview of the project (all pages, transitions, and design system) |
get_design_md |
Retrieve the contents of DESIGN.md |
set_wireframe_html |
Set and save the wireframe HTML for a page |
set_generated_html |
Set and save the generated design HTML for a page |
Example Instructions to AI
"Check the site structure with get_project_summary, then generate HTML wireframes for each page in order and save them with set_wireframe_html."
"Generate a wireframe for the poseidon-flow brd-home page and save it with set_wireframe_html."
"Fetch the design system with get_design_md, then generate design HTML for each page that reflects it, and save with set_generated_html."